Product Description

PVC letters for signs are custom cut from a flat sheet and a computer driven laser cuts each PVC letter to precision. The laser cut out letters have a smooth polished edge. Flat cut out PVC lettering for signage uses high density polyvinylchloride, which offers better rigidity and tensile strength. The plastic PVC offers high resistance to chemicals and corrosion, combined with UV inhibitors that help prevent colors from fading. Once the laser cut PVC lettering has been cut out, mounting hardware is attached for use during your installation. These PVC letters & numbers come with a lifetime warranty against fading, cracking, pitting or chipping and are easy to install.

Updated: 2025-09-12

We guarantee Gemini sign products for life. This means that if any exterior rated letter, logo, or plaque ever fades or breaks, we will replace it at no cost to you. Guaranteed.

~ Alphabet Signs

Product Reviews

Related Videos

Time 2:23 minutes

Watch video of how to install sign letters with stud mounting hardware.

Time 1:12 minutes

Watch video of how to install sign letters onto a brick wall.

Time 1:52 minutes

Watch video of how to use a mounting pattern for proper spacing and installation of sign letters.

UPPERCASE VERSUS LOWERCASE LETTERS

typography alphabet

The font has been carefully designed to allow a viewer's eye to easily see the shape of each character. Not each character in a font is exactly the same size; otherwise your sign lettering would be difficult to read. We name the font after its uppercase letter 'A' size but most lowercase letters are shorter. Some lowercase letter shapes such as 'b d f h k l' have ascenders which can be taller than the uppercase 'A' height. Some lowercase letters such as 'g j p q y' have descenders which go below the words baseline. Uppercase letters that are rounded such as 'C G J O Q S U' are taller than an uppercase 'A' because the rounded part extends above and below the baseline. Please call us if you need to know the character's actual size and not its named size.

Customers Also Bought These Items

Product Shipping Policy

This item ships UPS Ground to the continental US and once shipped, normally takes 2-5 business days to arrive in transit. UPS is one of the largest shipment and logistics companies in the world. UPS delivers more than 15 million packages a day to more than 6.1 million customers with exceptional real time tracking and notifications.

dimensional weight

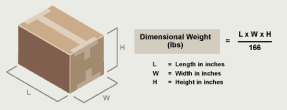
UPS offers the best value for medium size packages. UPS has been moving towards a dimensional weight pricing model where the shipping charges are calculated on the package weight, package dimensions and area delivered. The UPS shipping cost is calculated at check-out and adds to the cost of the order.

Shipping to AK and HI needs to be quoted and we will email you an invoice for the total cost before the order is processed. We are not set up for international shipments. We do not ship COD or bill to third parties.

All claims for damage must be made within 3 business days.

Product Return Policy

This item is returnable under the following conditions:

  • A Return Authorization Number is placed on the outside of the package.
  • Return to the shipper within 30 days of receipt of the package.
  • Return in original container and in salable condition, must not have been used.
  • No restocking fee is charged
  • Shipping fees are non-refundable.

Free returns means that we do not charge a restocking fee but we do not pay for return freight. Please call Alphabet Signs at 1-800-582-6366 for Return Authorization Number so we can properly refund your money.

INSTALLATION OF BUILDING SIGN LETTERS
SO SIMPLE THEY'D THOUGHT A PRO DID IT!

Christy will take you step-by-step through the process of installing building letters. Thoroughly clean application area of all dirt, tar, and wax. Mark the decal with a ruled line along the top of letters and down its center.

Stud Mount Method

  • 01
    install step one

    Tape one edge of the template to the installation surface and unroll it. Level the template and tape the other edge of the installation surface.

  • 02
    install step two

    Mark holes with center punch, then drill 1/4" holes 3" deep where indicated on your template. Remove the template and clean out all drill holes using any of the following methods: a quick puff of air, using the vents on your drill, compresses air or a turkey baster.

  • 03
    install step three

    Insert the studs into the stud holes on the back of each letter. Place letters in holes on wall before applying silicone to verify position. Adjust as necessary. Now fill the drill holes in the wall of the first letter with silicone.

  • 04
    install step

    Push the tube of silicone over each stud on the first letter in order to evenly coat it with adhesive.

  • 05
    install step five

    Push the letter into the drill holes using a shim or spacer to assure proper stand off of the letter from the wall. Repeat steps 2 through 4 for the rest of the letters.

Pad Mount Method

  • 01
    install step one

    Clean the installation surface firs. Position the spacing tape on the wall and secure one end with masking tape. Unroll, level and tape the other end. Spacing tapes show the general position of each letter.

  • 02
    install step two

    Apply silicone to all the pads on the letter first. Position the letter on the wall where indicated with the spacing tape. Tape the letter to the wall with several strips of masking tape.

  • 03
    install step three

    Adjust as needed, push letter against wall to ensure good adhesive bond. Continue with the remainder of the letters, and allow the silicone to cure before removing the masking tape. Temperature and humidity will influence silicone cure times. On some conditions letters should cure overnight.