Cast Bronze Letter Sign Designer

Product Description

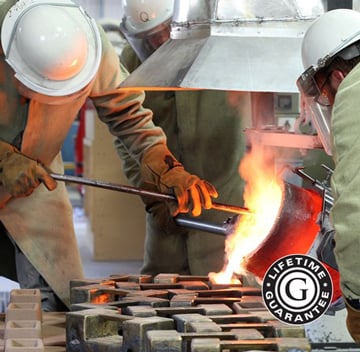
Lifetime guarantee! Each metal letter is precision cast bronze using up to twenty distinct manufacturing steps. The metal provides strength and permanence to your image. Seven metal finishes give you the choice of dazzling shine, brilliant color, or natural and antiquated metal. Combine these finishes with an extensive selection of letter styles to design signs that reflect your individual image.

The bronze cast sign letters use virgin bronze ingots Alloy NAVY G-88-8-0-4 lead free that are melted down in an all-electric, pollution free furnace. NAVY G-88-8-0-4 lead free is a superior metal for outdoor signage because of its strength and hardness.

The melted ingot is poured into a letter mold, which has been designed for excellent legibility. The mold also has added depth to give your character real dimension. Once your letter has been cast by skilled craftsmen, it is shot blasted, degated and belt sanded in preparation of finishing. The cast metal characters are turned over, drilled and tapped at the appropriate stud diameter for its stud mounting hardware used during your installation. In the finishing process, the letter is bead-blasted to make it precise and smooth then stroke sanded to give it a natural satin finish. The letters are set up on a rack where it is coated with a two-part hardened acrylic polyurethane clear coat, then sent to an oven for baking. Your letters are then laid out for careful quality inspection then seal-tight packaged so your letters arrive mistake-free.

The online sign designer is for font style preview only. We provide the approximate sign dimensions for comparison purposes only. We have taken great care in providing the closest sign dimensions possible. Due to manufacturing processes beyond our control (temperature, pressure, mold locations) we cannot guarantee an exact line length. As a rule of thumb, allow 15% margin for space around the letters. This makes your sign more effective as well. Please call for exact dimensions.

These characters come with a lifetime warranty against fading, cracking, pitting or chipping as long as the letters are installed in their original location. Routine maintenance of rinsing with mild soap and water usually will restore the metal surface to its original appearance.

how cast metal letter made

What are the benefits of cast metal letters?

Strength, texture, image and durability. Each metal letter is precision cast in aluminum or bronze using up to twenty distinct manufacturing steps. The metal provides depth and permanence to your image. Seven metal finishes give you the choice of dazzling shine, brilliant color, or natural and antiquated metal. Combine these finishes with an extensive selection of letter styles to design signs that reflect your individual image.

cast metal sign letter on wall

What's better, cast metal or flat cut?

The biggest difference is that cast metal letters have more depth than a flat cut out metal letter. Cast metal letters are hollow in the back so your not paying for all the material that won't be seen anyway. Cast metal letters are available in over fifty font styles and standard sizes whereas flat cut metal has unlimited options in sizes and fonts. Otherwise, both cast metal and flat cut letters have the same mineral properties and finishes selections.

custom cast metal logos

Can you make custom logos and fonts with cast metal?

Yes we can make custom logos, fonts and graphics with cast metal materials. Cast metal can come in different color selections and material finishes. Contact us with your vector based artwork to start a price quote.

Updated: 2025-09-05

We guarantee Gemini sign products for life. This means that if any exterior rated letter, logo, or plaque ever fades or breaks, we will replace it at no cost to you. Guaranteed.

~ Alphabet Signs

Product Reviews

No reviews for this product.

Related Videos

Time 0:51 minutes

Watch video of how cast metal sign letters are made.

Time 2:23 minutes

Watch video of how to install sign letters with stud mounting hardware.

Time 1:12 minutes

Watch video of how to install sign letters onto a brick wall.

Time 2:23 minutes

Watch video of how to use a mounting pattern for proper installation of sign letters.

UPPERCASE VERSUS LOWERCASE LETTERS

typography alphabet

The font has been carefully designed to allow a viewer's eye to easily see the shape of each character. Not each character in a font is exactly the same size; otherwise your sign lettering would be difficult to read. We name the font after its uppercase letter 'A' size but most lowercase letters are shorter. Some lowercase letter shapes such as 'b d f h k l' have ascenders which can be taller than the uppercase 'A' height. Some lowercase letters such as 'g j p q y' have descenders which go below the words baseline. Uppercase letters that are rounded such as 'C G J O Q S U' are taller than an uppercase 'A' because the rounded part extends above and below the baseline. Please call us if you need to know the character's actual size and not its named size.

Customers Also Bought These Items

Plastic Formed Sign Letters

Acrylic Letters

Minnesota Molded Sign Letters

Aluminum Sign Letters & Numbers

Product Shipping Policy

This item ships UPS Ground to the continental US and once shipped, normally takes 2-5 business days to arrive in transit. UPS is one of the largest shipment and logistics companies in the world. UPS delivers more than 15 million packages a day to more than 6.1 million customers with exceptional real time tracking and notifications.

dimensional weight

UPS offers the best value for medium size packages. UPS has been moving towards a dimensional weight pricing model where the shipping charges are calculated on the package weight, package dimensions and area delivered. The UPS shipping cost is calculated at check-out and adds to the cost of the order.

Shipping to AK and HI needs to be quoted and we will email you an invoice for the total cost before the order is processed. We are not set up for international shipments. We do not ship COD or bill to third parties.

All claims for damage must be made within 3 business days.

Product Return Policy

This item is returnable under the following conditions:

  • A Return Authorization Number is placed on the outside of the package.
  • Return to the shipper within 30 days of receipt of the package.
  • Return in original container and in salable condition, must not have been used.
  • No restocking fee is charged
  • Shipping fees are non-refundable.

Free returns means that we do not charge a restocking fee but we do not pay for return freight. Please call Alphabet Signs at 1-800-582-6366 for Return Authorization Number so we can properly refund your money.

INSTALLATION OF BUILDING SIGN LETTERS
SO SIMPLE THEY'D THOUGHT A PRO DID IT!

Christy will take you step-by-step through the process of installing building letters. Thoroughly clean application area of all dirt, tar, and wax. Mark the decal with a ruled line along the top of letters and down its center.

Stud Mount Method

  • 01
    install step one

    Tape one edge of the template to the installation surface and unroll it. Level the template and tape the other edge of the installation surface.

  • 02
    install step two

    Mark holes with center punch, then drill 1/4" holes 3" deep where indicated on your template. Remove the template and clean out all drill holes using any of the following methods: a quick puff of air; using the vents on your drill; compresses air or a turkey baster.

  • 03
    install step three

    Insert the studs into the stud holes on the back of each letter. Place letters in holes on wall before applying silicone to verify position. Adjust as necessary. Now fill the drill holes in the wall of the first letter with silicone.

  • 04
    install step

    Push the tube of silicone over each stud on the first letter in order to evenly coat it with adhesive.

  • 05
    install step five

    Push the letter into the drill holes using a shim or spacer to assure proper stand off of the letter from the wall. Repeat steps 2 through 4 for the rest of the letters.

Pad Mount Method

  • 01
    install step one

    Clean the installation surface firs. Position the spacing tape on the wall and secure one end with masking tape. Unroll, level and tape the other end. Spacing tapes show the general position of each letter.

  • 02
    install step two

    Apply silicone to all the pads on the letter first. Position the letter on the wall where indicated with the spacing tape. Tape the letter to the wall with several strips of masking tape.

  • 03
    install step three

    Adjust as needed, push letter against wall to ensure good adhesive bond. Continue with the remainder of the letters, and allow the silicone to cure before removing the masking tape. Temperature and humidity will influence silicone cure times. On some conditions letters should cure overnight.